Tuesday, September 6, 2011
Rescue Part 2
In the first part of this rescue you saw how I reattached the headstock. In this part you'll see how I replaced the missing pieces of wood and reinforced the break so it will never happen again...
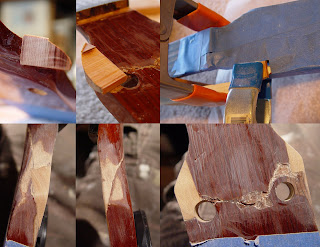
As you can see in the first image I glued in some wood with similar color and grain characteristics. Once the glue dried I chipped, sanded and scraped away until the patch was flush on all sides with the original wood.
In the second image you can see where I have routed grooves to fit the shims that will reinforce the neck. After gluing in the shims and grinding them flush with the neck I lightly sanded the overall area to make sure you couldn't feel them.
I then applied a coat of sanding sealer to the exposed wood, sanding this flush once dry.
Next I brushed on a couple of coats of Lacquer to build up the repair and fill any leftover cracks so it will be undetectable to the touch.
At this point I will be experimenting with the finish. My goal is to have an opaque faux finish that matches the surrounding original finish hiding the repair as much as possible.
More to come!
Subscribe to:
Post Comments (Atom)


No comments:
Post a Comment